


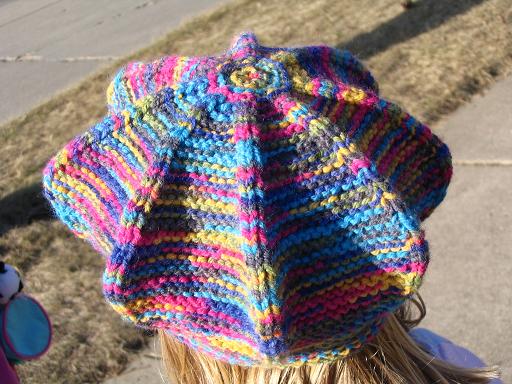


Photographs of hats made with this technique. The first hat is described at the end of this posting and directions are included. Patterns for the next 5 are available from www.knittingvault.com There are 2 views of the red beret as the top view did not do it justice. The ribbed beret is a free pattern that is listed in the first posting on this blog.
SUPER SIMPLE HAT DESIGNING
This is a super simple method of knitting hats—from the top down. The advantage of this method is that you can eliminate gauge swatches and just pick up any yarn and needles and start knitting. If unsure of your choices, I suggest that you follow the recommendations on the yarn bands.
You size your hats by measuring with a ruler so the exact number of rows doesn't matter. Then there is a little trick before adding ribbing that makes the hat fit comfortably. You will need to know how to do a circular cast on and use magic loop knitting. Directions for both follow. DPN or 2 circulars can also be used if that is your preferred way to knit. I also use a row counting yarn chain to space my increases. This is made by tying yarn around 2 needles with a square knot, then turning the needles over and tying another square knot and repeating until you have a chain with 4 loops and a tail. The loop at the top is number 1 and the loop by the tail is number 4.
Most hats require les than 200 yards of yarn or approximately 50 gms. The length of the circular needle is not important. Mine are 40 inches long. I don't recommend using 16 inch needles as they tend to cramp the hand. The hat is worked in 8 wedges so each set of directions is repeated a total of 8 times. This technique also works for hats with 6 sections on top or 7. The difference is that the top is flat with 8 sections and curves upward with less.
CAST ON
http://martianmischief.blogspot.com/2006_03_26_archive.html
Make a slip knot that will close (untie when you pull on the tail end of the yarn, not the skein end of the yarn.) Hold this slip knot in your left hand with the side that will slide down. In the circle or loop, YO, K1, YO, K1, YO, K1, YO, K1. To make a YO, bring the yarn between the points of the needles to the front and then wrap it over the right needle letting it hang down the back ready for the next stitch.
You now have 4 YO and 4 stitches on your needle. Slide them onto the cable part of the needle and then fold them in half. Bring the cable out between stitches 4 and 5 and slide the stitches back onto the needles.
Now you are ready to knit around in a circle. With the circular cast on, there is no need to attach your stitches as the cast on already does that for you. Hold the needles in your left hand with the needle that has the skein of yarn attached to it on the bottom. Hold onto the tip of that needle and draw it out until you can curve the cable around and bring the needle points together. Knit the 4 stitches on one needle, draw that needle out again and knit the stitches on the second side. You have completed one row. On the next round follow your hat pattern. I usually put a stitch marker between the first and second stitch to mark the beginning of the round.
INCREASES:
How you make your increases will alter the shape of the top of the hat, but they can be made in any way that you like, so for a basic or first hat just make 8 increases every other row. This will show as a gentle spiral on top of your hat. 16 increases every 4th row (an increase before and after each marker) will make 8 even sections. That is the method used on the berets pictured at the top. 4 increases every row will make a hat with a square top. A lot of designing is possible in making the increases, both in the spacing of the increases and the type of increase used. It will all work out if you maintain the proportion of 8 increases every other row.
Another alternative way to make your increases is to use the same principle that Elizabeth Zimmerman uses in her Pi designed shawls. That is to double the total number of stitches on rows 3,6,12,24. The problem with this technique is that you must check that you do not have too many stitches when the top circle is finished.
BASIC PATTERN:
For a spiral top:
Cast on row
Row 1--Knit 1 rows
Row 2—first increase row—increase in first stitch, k1, repeat 7 times for a total of 8 sections.
Repeat rows 1 and 2 until top is desired size. I find it convenient to place markers before each section in order to avoid the necessity of counting for increases.
Continue with straight knitting without increases until total length desired is reached.
Work edge treatment
Bind off
For 8 even wedges:
Work rows 1 and 2 just like spiral top hat. Work 3 rows between increase rows, placing markers every 2 stitches.
Increase row:Make increase before marker, knit 1, make increase, knit to next marker, repeat for each section
knit 3 rows even
Repeat these last 4 rows until top is desired size.
Continue with straight knitting without increases until total length desired is reached.
Work edge treatment
Bind off
THE SIZING SECRET
Measure from the center to one of the markers or the outer edge of the knitting.
To fit actual head size this measurement and total length from
in inches of: should be: center top is:
newborn 14.....................2.25 in.........................6.24.in.
Infant 16.........................2.5 in............................7.5 in.
toddler 18.......................2.75 in..........................8.75 in.
child and teen 20...........3.25 in........................10.75 in.
teen and adult 22...........3.5 in..........................11.5 in.
lge adult 24.....................3.75 in........................12.75 in.
When the diameter of the top is the size you want, begin knitting in rounds without making any increases or decreases until you reach the total length listed above.
The only thing left to add is the edge finish.
Rolled edge—knit another inch or two in garter stitch and bind off
Ribbed band—work ribbing with a needle 2 sizes smaller than that used on body of the hat. 1 inch is enough to keep the hat on comfortably but the length of the ribbing is optional as long as the combined length is equal to the total length in the chart above plus 1 inch. The amount of ribbing folded up must be added to this total.
For a beret, follow the directions above until you have the top knit then count the stitches between the markers and remember that number. Continue enlarging the top until it is the diameter desired. Historically a beret is 9 to 10 inches in diameter. It was made this side in order to block it by placing a dinner plate inside of it. When you have your desired diameter, work 1 to 2 inches straight and then begin to make decreases in the same manner as you made the increases. When the number of stitches between the markers matches the number you counted above, begin your edge finishing.
For an earflap hat, mark off 2 sections that are about 1/6 of the total number of stitches. Continue to work these sections in stockinette stitch when you are working the ribbing. For children, place these exactly opposite of each other. For older children and adults, they can be placed toward the back half of the hat leaving more stitches free on the front. When your 1 inch of ribbing is finished, bind off the stitches between the stockinette sections, keeping the stockinette areas on your needle. Work each stockinette area individually. Continue to work the flaps in this manner: Work rows 1 and 2 4 times. On row 9 work row 3 then 4. Continue repeating these 4 rows until you have between 4 and 5 stitches left. Cut tail of yarn and thread on a yarn needle. Run needle through remaining stitches, draw up tightly and tie off, bury end tail.
Row 1—knit
Row 2—knit 2, purl to last 2 stitches, knit 2
Row 3—knit 2, make a decrease, knit to last 4 stitches, make a decrease, knit 2
Row 4—purl
Repeat with second earflap. Make twisted cord and attach to each end of flap for ties if desired. I attach my twisted cords by twisting 5 times desired finished length, drawing the cord through the end of the flap and then allowing it to twist after knotting off the bottom.
posted by fran | 7:38 AM
|
2 comments
![]()